供应德国WAZAU布氏硬度标准机*** 6507/1 ; *** 3738/1实验设备
- ¥158.00 1台起批
- ¥148.00 2台
- ¥138.00 ≥3台
- 否是否进口
- /产地
- 是加工定制
德国WAZAU布氏硬度标准机*** 6507/1 ; *** 3738/1
型号 | HNME HB 3000/IM | HNME HB 3000/IM |
试验力Fmax | 3000kgF/29.42kN | 3000kgF/29.42kN |
阶梯力刻度 | (31.25, 62.5, 100, 125, 187.5; 250; 500; 750; 1000; 1500; 2000; 2500; 3000)kgf | (187.5; 250; 500; 750; 1000; 1500; 3000)kgf |
静负载 | 悬吊装置(+ 31.25 + 31.25 + 62.5 + (125 125) + (125 + 125) + (125 + 125) + (4 x 125) + (4 x 125) + (4 x 125) + (4 x 125) ) kgf (随所在地的重力加速度调整) | 悬吊装置(+ 62.5 + 62.5 + 125 + (125 + 125) + (125 + 125) + (125 + 125) + (4 x 125) + (4 x 125) + (4 x 125) + (4 x 125) ) kgf (随所在地的重力加速度调整) |
阶梯力 | 电力-机械式 | 电力-机械式,软件自动加载 |
力的产生 | 依次电力-液压、手控、时间控制 | 依次电力-液压、软件控制、时间控制 |
力***度 | < 1 x 10⁻⁴ | < 1 x 10⁻⁴ |
压痕测量 | 测量显微镜 | 数显压痕测量系统:压痕显示在软件界面上 |
压头 | 钢球压头:规格10.0; 5.0; 2.5 mm,各五件; | 钢球压头:规格10.0; 5.0; 2.5 mm,各五件; |
硬度标准块 | HBS 10/1000 型、HBS 10/3000型、HBW 10/3000型、HBS 5/250型、HBS 5/750型、HBW 5/750型、HBS 2.5/187.5型、HBW 2.5/187.5型各3块 | HBS 10/1000 型、HBS 10/1500 型、HBS 10/3000 型、HBW 10/3000 型、HBS 5/250 型、HBS 5/500 型、HBS 5/750 型、HBW 5/750 型、HBS 2.5/187.5型、HBW 2.5/187.5型各3块 |
控制装置 | - | 包括电脑、显示器、打印机、数据获取和控制板;数据处理分析软件 |
设备的高度 | 3.80m | - |
1.. FIIELD OF APPLIICATIION
Hardess standardizing machines are special primary hardness testers for the calibration of hardness
reference plates, for the test of Rockwell diamond indenters, and the conduction of procedure
examinations.
The HNME serves the conduction of hardness measurings with forces of 10 kp/98.07 N to 150 kp/1471 N
corresponding to the procedure conditions:
ROCKWELL
HRA, HRC, HRDwith a diamond indenter
HRBHM with a indenter 1/16" ∅ HM
HRH, HRE, HRK with a indenter 1/8" ∅
HRL, HRM, HRP with a indenter 1/4" ∅
VICKERS
HV 10, HV 20, HV 30, HV 50 with diamond indenter.
Remark: For HV 20, HV 30 and HV 50 the application of the respective force is carried out in two steps.
For the conduction of hardness measurings the following international normatives are recommended:
For hardness measuring:
*** 6507/1 (HV 5 to HV 100); *** 3738/1 (HRA).
For the test of hardness reference plates:
***/DP 640 (HV 0.2 to HV 100); *** 674 (HR…)
Euro standards: E 117 (HRB, C, N, T); E 127 (HV;) E 128 (HB)
OIML recommendations:
R I no. 10 (HV); R I no. 11 (HRB); R I no. 12 (HRC)
Literature recommendation:
OIML publications:
1984:" Härtenormalplatten und Eindringkörper "
HNME HR 150 Page 2
"Hardness test blocks and indenters "
1991:"The Vereinheitlichung of the hardness measuring "
"The unification of hardness measurement "
2.. EQUIIPMENT DESCRIIPTIION AND ACCURACY IINFORMATIION
2..1 EQUIIPMENT DESCRIIPTIION
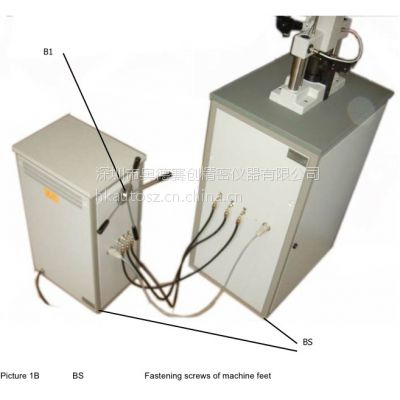
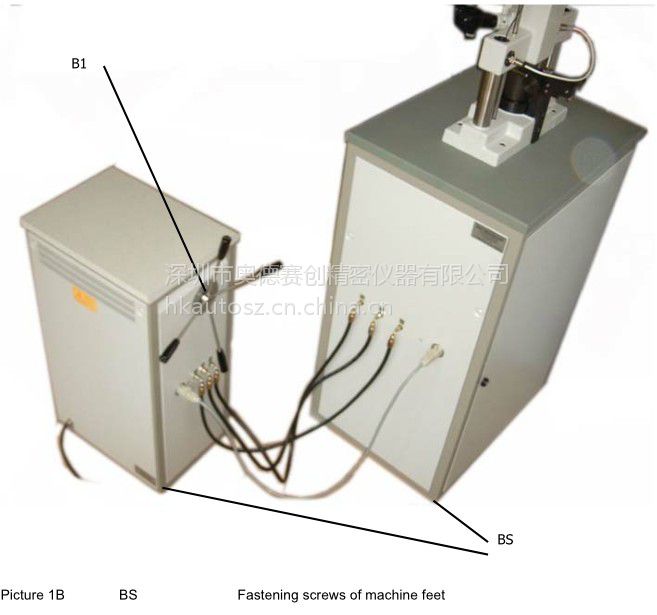
The HNME (picture 1A and picture 1B) consists of the actual measuring device with indentation measuring
unit and the control rack.
2..1..1
The measuring device consists of an upper portal (picture 2) with microscope /SP/ and the loading part in
the lower body. The schematic (picture 3) shows the principle of the structure of the measuring device.
The forces required for the hardness measuring are generated by mass plates /MA/ in the lower
equipment part and by the hanging mass support /U/ and /O/ are applied on the indenter /E/ through the
pressure stamp /D/ on portal /PO/. Those hanging mass supports works also as additional forces. Moving
the hanging mass support – raising at relief and lowering at loading - is carried out hydraulically. The
pressure required for this is generated by the pump unit in the control rack, transferred into the piston
room /H/ controlling the piston /K/. In order to couple the hanging mass supports time-dependently, that is
to ensure a contineous force rise, a spring /F2/ links the hanging mass supports.
There is also a linking spring in the portal /PO/ in between pressure stamp /D/ and upper hanging mass
support /O/. The pressure stamp /D/ is vertically guided nearly frictionless on two levels /EB/. In his middle
there is the glass scale /M/ whose movement is measured by means of a spiral microscope /SP/. At the
lower end of the pressure stamp, by means of screwing cap /SK/, the indenter /E/ is fastened. That way
the indenter movement corresponds to the scale movement in accordance with the ABBE principle.
The lower cross-head of the portal /PO/ comprises the table /T/ to place on the hardness reference plate
/HNP/. The spiral microscope is located in the upper cross-head and can be focussed by releasing the
clamping screw /KS/ (picture 14) using the retainer /SR/.
2..1..2
The control rack contains the control elements (picture ***, picture 5B, picture 5C), and in its inside the
pump unit with the hydraulic and electrical installation (picture 6). Control rack and measuring device are
connected to each other by four cables. They stand right-angled to each other.
HNME HR 150 Page 3
For the operation the following display controls are available at the upper portal (picture 4):
1.
Visual (four colors) displayment of the respective step of the procedure sequence of operation
/A1/
2.
Control lamp for a safe operation /A4/. The time relays are placed in the control rack (picture
***). They are controlled by the hanging mass support contacts during the movement
sequence of operation.
Operating devices are:
1.
Main switch of the hydraulics /B1/ (picture 5 B)
The control elements comprise:
1.
Control valve for the pre-force /S1/
2.
Control valve for the total force /S2/
3.
Control valve for the measuring force /S3/.
The hydraulics operation pressure is 12 bar. It is displayed on the manometer /M/ and adjusted by the
control valve /S4/.
.II
2..2 ACCURACY Y IINFORMATIION
The HNME was undergone a check by which the following results were determined.
2..2..1
The accuracy of the mass plates /MA/ s and the hanging mass support /O/ and /U/: <1 x 10⁻⁴ of the
respective mass. This applies to the upper hanging mass support using the 1/8" indenter. The
determination of the mass was arried out under consideration of the local standard gravity on the set-up
site "gA" and at the test site "gP" for which gA/gP = 1.001574. For the air impetus 1.2 mg/cm3 was
calculated.
2..2..2
The penetration depth measuring unit with glass scale and spiral microscope was checked with a 200 µm
interferentially checked block gauge in the indicating range of the spiral microscope.
The fault for this indicating range amounts to ≤ 0.1 µm.
 在线问
在线问
- 否
- /
- 是
- 德国WAZAU
- HNME HB 3000/IM
- 德国WAZAU布氏硬度标准机
- /
- /
- 德国WAZAU
- /


